
The Dialog Loop: The Heartbeat of Every Autonomous Agent (Part 2)

Series: The Agent Harness — Part 2 of 12
Every autonomous agent is, at its core, a loop. Ask the model something. Get a response. If it wants to call a tool, run the tool and feed the result back. Repeat until done.
This sounds simple. It isn’t.
The loop has to handle streaming output, mid-task interruptions, context window limits, ten different ways a turn can end, concurrent tool calls, and state that must survive across dozens of iterations without corrupting. Getting any one of these wrong makes the agent brittle. Getting all of them right is what separates a demo from a production system.
In this post we’ll examine the dialog loop as a generic engineering problem, then look at how Claude Code’s implementation addresses it. Whether you’re using Claude, GPT, Gemini, or a local model, the loop infrastructure is nearly identical — and the decisions Claude Code made are worth understanding.
In Part 1 we established what an Agent Harness is and why you need one. This post goes inside the most fundamental component: the loop itself.
Why Not Recursion?
The most intuitive way to implement an agent loop is recursion:
def agent_turn(messages):
    response = call_llm(messages)
    if response.has_tool_call:
        result = execute_tool(response.tool_call)
        return agent_turn(messages + [response, result])  # recurse
    return response.text
It’s elegant. It reads naturally. And it has three problems that matter in production.
Problem 1: State recovery. When context overflow happens mid-loop, you need to compress the history and continue. In a loop, that’s state.messages = compressed; continue. In recursion, you’d need to unwind the entire call stack to inject the compressed context. The more turns deep you are, the more complex this becomes.
Problem 2: Abort control. When a user presses Ctrl+C, you need to stop immediately, clean up any running tools, and exit gracefully. In a loop, you check if abortSignal.aborted: break at the top of each iteration. In recursion, you’d need to pass and check the abort signal at every recursive level — and missing a single check means the agent runs on after the user asked it to stop.
Problem 3: Debuggability. State changes in a loop happen at a fixed, predictable location. One breakpoint captures all transitions. In recursion, state evolves across multiple call stack frames, each at different depths.
The rule: Use a while(true) loop with explicit continue and break, not recursion. Every production agent harness I’ve seen that works well uses this pattern.
The Right Abstraction for the Loop: AsyncGenerator
Once you’ve committed to a loop, the next question is: what’s the right abstraction to contain it?
A plain function won’t work — it runs to completion before returning. Users need to see streaming output as the model thinks and tools execute, not just a final answer.
Callbacks and event emitters work but lead to callback hell and memory leak risks. Promises are one-shot — they can’t express a continuous event stream. RxJS Observables are powerful but heavyweight.
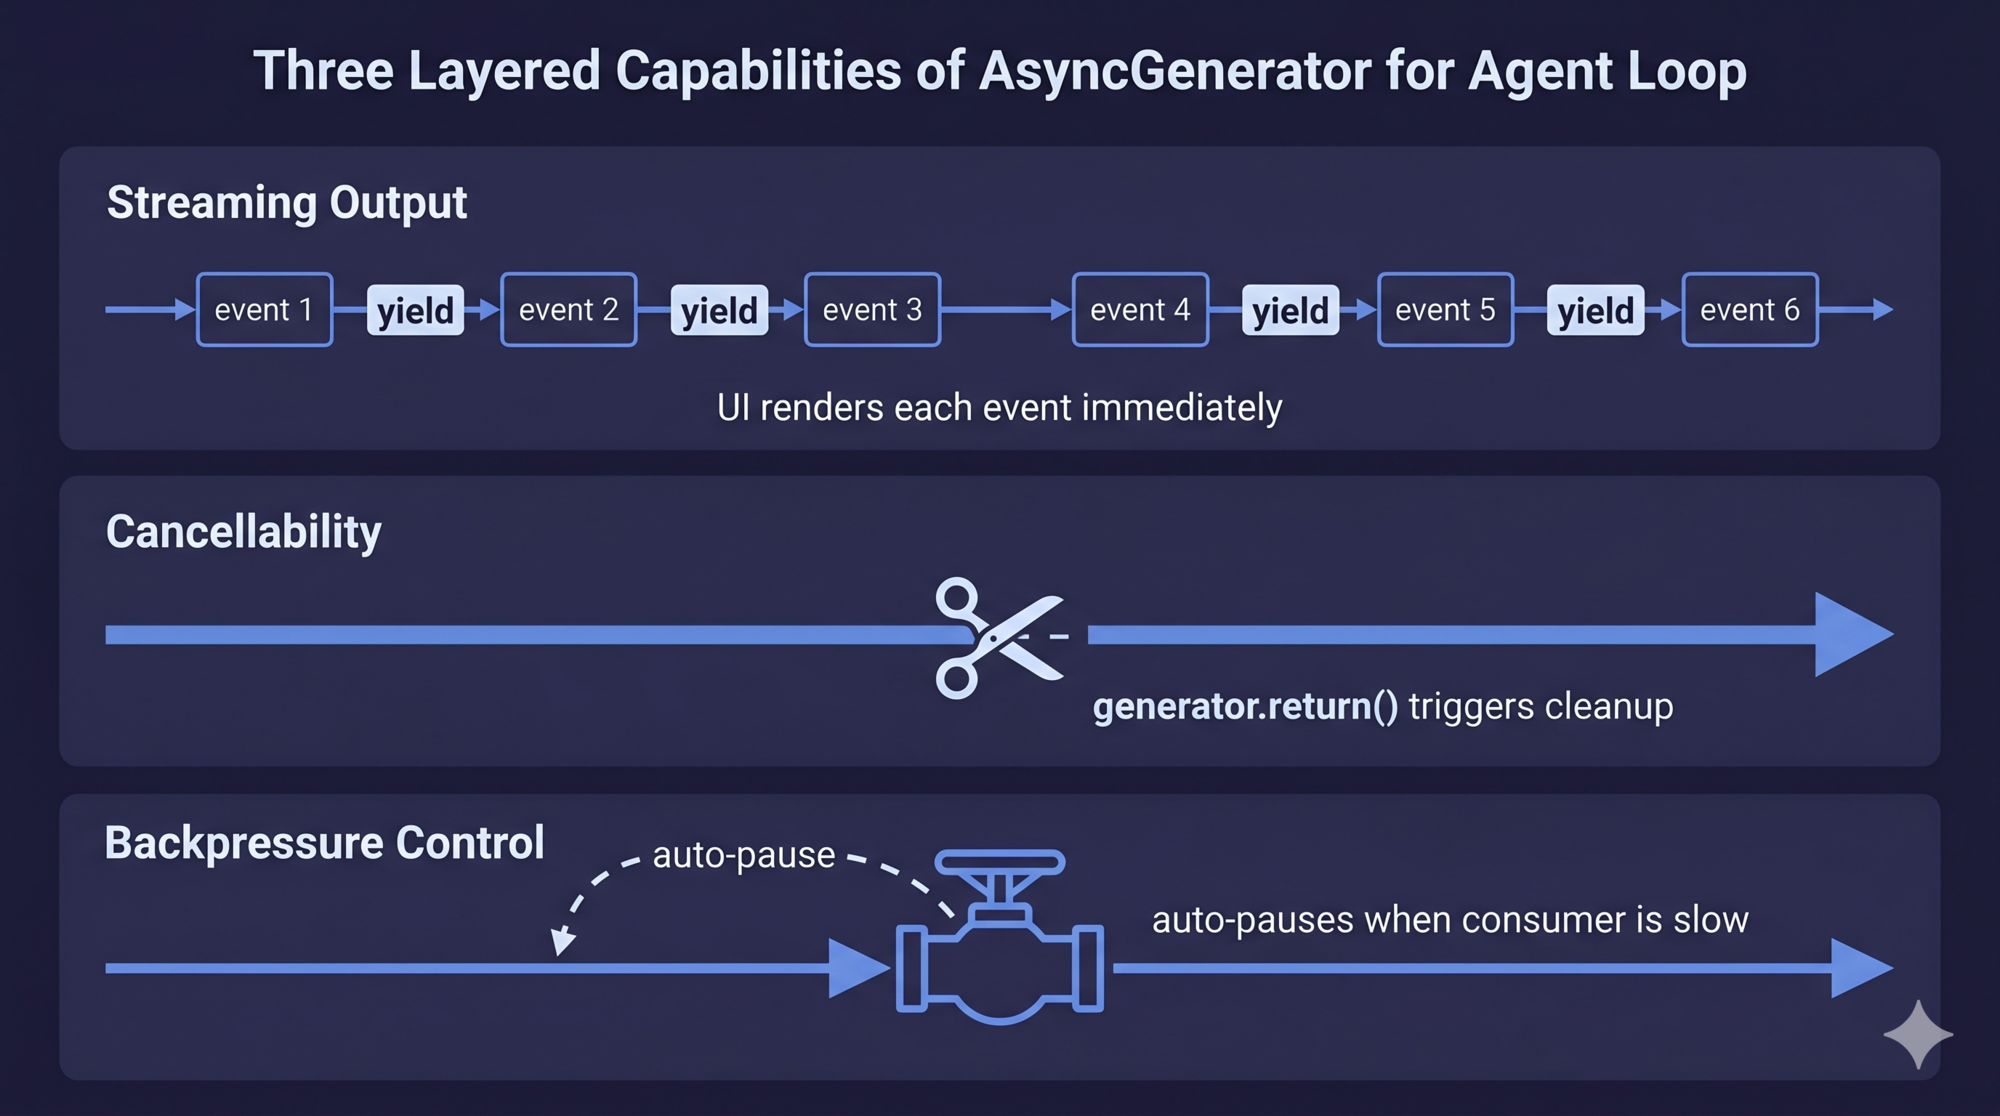
The answer is AsyncGenerator. Here’s why it uniquely fits the agent loop:
| Requirement | AsyncGenerator | Promise | Callback | EventEmitter |
|---|---|---|---|---|
| Stream intermediate events | ✅ yield |
❌ | ✅ | ✅ |
| Cancellable mid-stream | ✅ .return() |
❌ | Manually | Manually |
| Backpressure (auto-pause when consumer is slow) | ✅ Native | ❌ | ❌ | ❌ |
| Type safety | ✅ | ✅ | ❌ | ❌ |
| Zero extra dependencies | ✅ | ✅ | ✅ | ✅ |
AsyncGenerator is the only pattern that hits all four simultaneously.
Backpressure deserves special attention. When a tool runs a large npm install, it produces megabytes of output. If the generator can produce events faster than the UI can render them, and there’s no backpressure, you accumulate unbounded memory. AsyncGenerator pauses automatically when the consumer calls await iterator.next() — it won’t produce the next event until the current one is consumed.
Case Study: Claude Code’s Loop Signature
Claude Code’s dialog loop is defined as async function* queryLoop(params) that yields a union of five event types:
- stream_request_start — emitted before each API request, lets the UI show “thinking…”
- StreamEvent — raw streaming tokens from the API, forwarded directly to the UI
- Message — structured messages (UserMessage, AssistantMessage, SystemMessage, AttachmentMessage, ProgressMessage)
- TombstoneMessage — marks a previous message as deprecated (used when streaming fallback occurs)
- ToolUseSummaryMessage — brief summary of a completed tool batch for collapsed display
These five types cover everything the UI needs to know at every moment during a turn. The union type ensures temporal ordering — events arrive in exactly the order they were produced.
The Five-Phase Turn Lifecycle
A single “turn” — from user input to the model’s response or next tool call decision — passes through five phases. Every agent harness needs to implement these, though the details vary.
Phase 1: State Initialization
Phase 2: Context Preprocessing
Phase 3: API Call (streaming)
Phase 4: Tool Execution
Phase 5: Tool Result Backfill → back to Phase 1
Phase 1: State Initialization
At the start of each iteration, destructure all the variables you need from the current state object. This snapshot pattern — read everything at once, then work on the snapshot — prevents partial-read inconsistencies across a multi-step iteration.
In Claude Code: the state object holds message list, tool context, compression tracking, recovery counters, turn count, and the reason for the last continue. At the end of the iteration, a new state object is written atomically.
Design lesson: There should be a clear read/write boundary on state within a loop iteration. Read from the current state snapshot at the start. Write a new state object at the end. Never read from state you’re in the middle of updating.
Phase 2: Context Preprocessing
Before calling the model, run the preprocessing pipeline. This is where most harnesses underinvest. The preprocessing pipeline is what stands between your agent and the context window limit crashing it at turn 15 of a complex task.
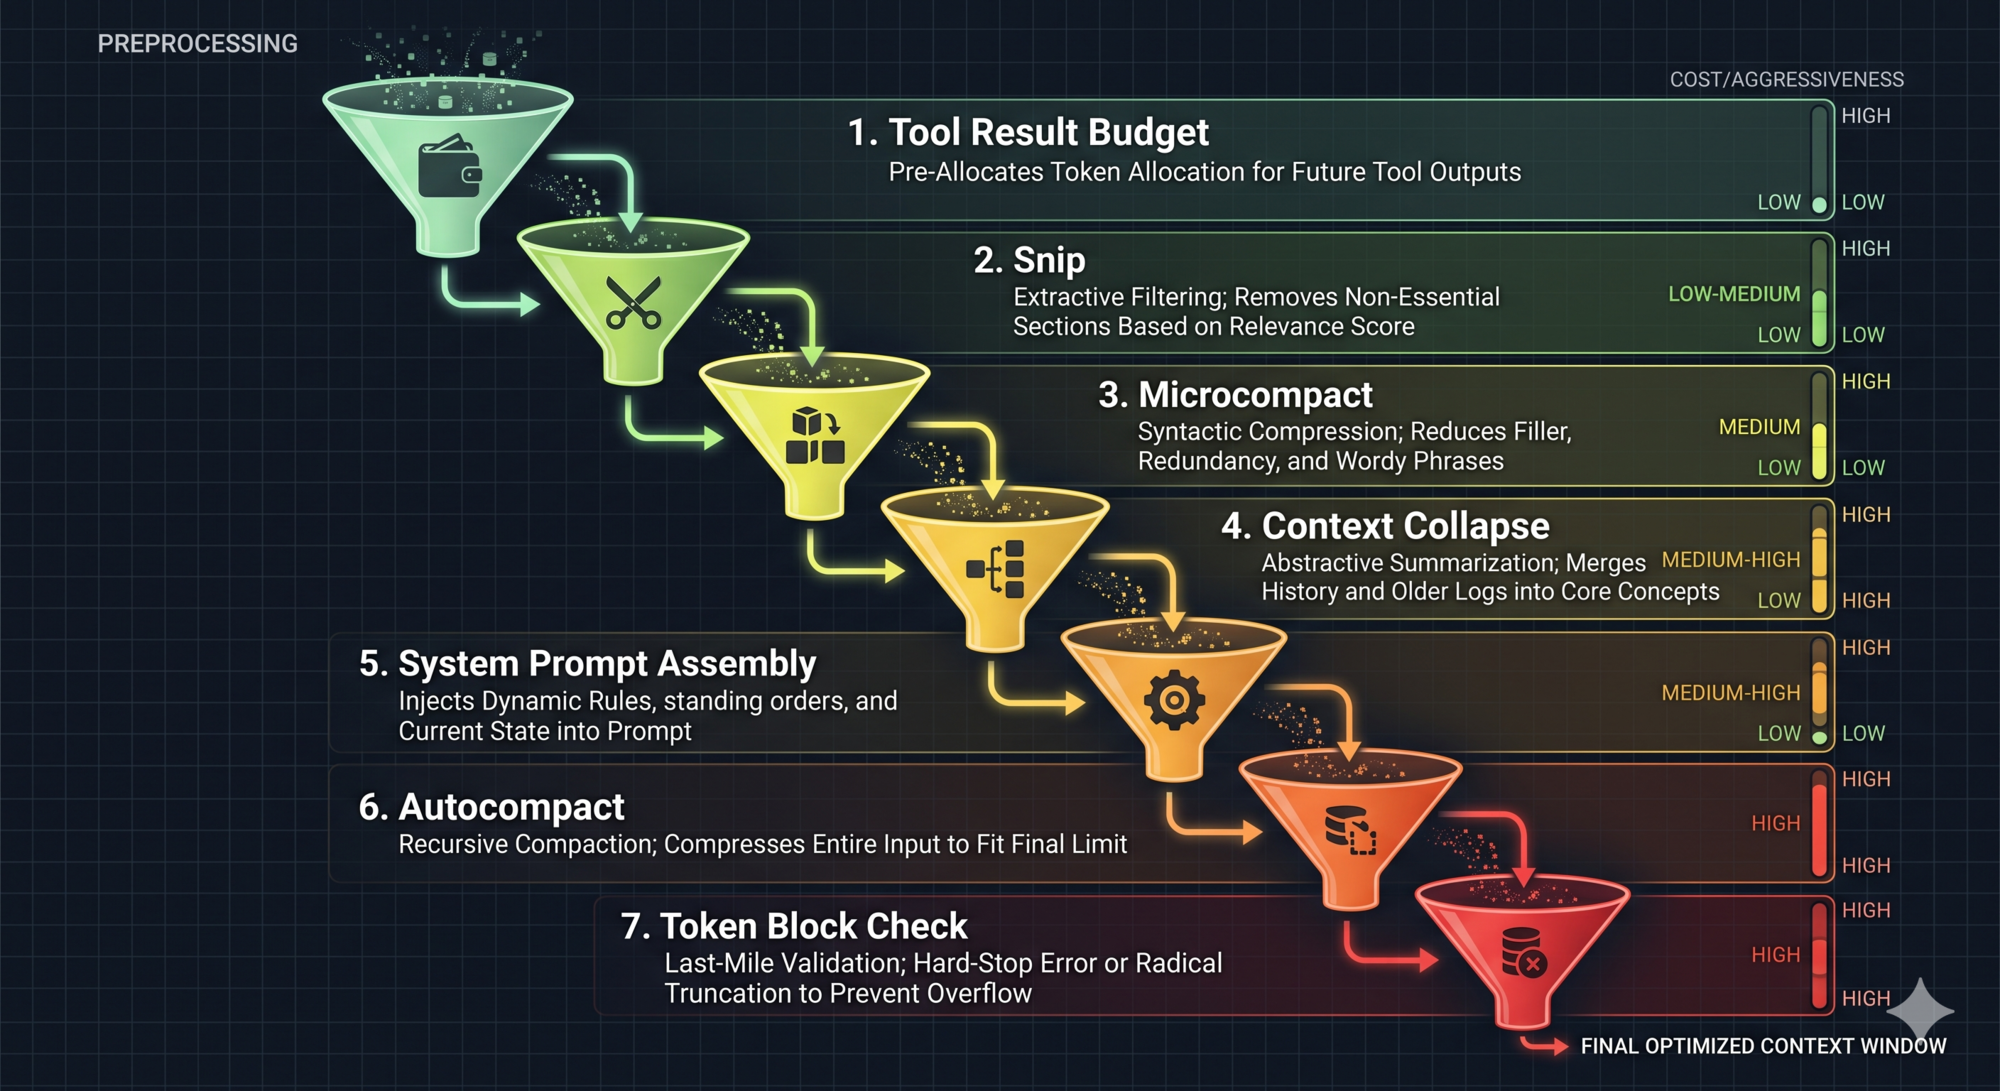
Claude Code runs a seven-step pipeline, ordered from cheapest to most aggressive:
- Tool Result Budget — Truncate or persist oversized tool results to disk (like OS paging: too large for RAM, store it, keep a reference)
- Snip — Trim excessively long history messages directly
- Microcompact — Cache-friendly lightweight compression that reuses already-cached tokens
- Context Collapse — Fold redundant consecutive messages into a compact view
- System Prompt Assembly — Merge base prompt + dynamic context into the final system prompt (stability matters here: unstable assembly invalidates the prompt cache)
- Autocompact — Full summary of conversation history when other methods are insufficient
- Token Block Check — Hard limit check; if exceeded, fail fast with an error rather than sending a doomed API request
The ordering principle: try lightweight methods first, escalate only when necessary. Each step loses some information, so you want to delay the most aggressive methods (Autocompact, Snip) as long as possible.
This principle transfers directly: design your own preprocessing pipeline as a cascade of compression strategies, not a single “compress everything” trigger.
Phase 3: API Call (Streaming)
Send the assembled message list, system prompt, and tool definitions to the model. Process the streaming response token by token.
Two important behaviors:
- Mixed responses: The model may include both text and tool calls in one response. Handle both simultaneously — yield text tokens to the UI while collecting tool call blocks for execution.
- Immediate execution start: If streaming tool execution is enabled, start executing the first tool call as soon as its parameters are complete, before the model finishes generating the rest of the response. More on this in Part 10 (Streaming Architecture).
Phase 4: Tool Execution
If the model called tools, execute them. The execution result is both:
- Yielded to the UI for real-time display
- Collected for the next API call
This dual-use — same yield serves both UI and history — means you don’t need separate code paths for “show the user” and “remember for next call.” They’re the same operation.
Phase 5: Backfill and Continue
Inject any pending attachments (memory files, file change notifications, queued commands), package the updated message list into a new state object, and continue back to Phase 1.
The loop continues until the model returns a pure text response (no more tool calls) or a termination condition is hit.
The Ten Termination Conditions
Most tutorials show the happy path: the model finishes, return the text. Production agents need to handle everything else.
Claude Code defines ten distinct termination reasons:
| Reason | What triggered it | What it tells you |
|---|---|---|
completed |
Model returned text with no tool calls | Task finished normally |
aborted_streaming |
User pressed Ctrl+C during model output | User-initiated, immediate stop |
aborted_tools |
User pressed Ctrl+C during tool execution | Tool was cancelled mid-run |
max_turns |
Hit the configured loop count limit | Prevents runaway loops |
blocking_limit |
Token count exceeded hard limit | Context budget exhausted |
prompt_too_long |
All compression methods failed | Context unrecoverable |
model_error |
API call threw an exception | Network or server failure |
stop_hook_prevented |
A stop hook blocked continuation | User-configured auto-stop condition |
hook_stopped |
A tool hook blocked execution | External hook decision |
image_error |
Image input had bad size or format | Input data problem |
Why does granularity matter? Because when your agent stops unexpectedly, the termination reason is the first clue for debugging. A generic "error" tells you nothing. model_error says “check your API connection.” prompt_too_long says “your compression strategy isn’t working.” max_turns says “this task is longer than you expected.”
Design the termination reason taxonomy before you build the loop. It shapes how you write recovery logic and how you surface information to users.
Design lesson: All abnormal terminations should trigger cleanup: cancel executing tools, release resource references, log the reason. Deterministic cleanup prevents “dirty” state from leaking into the next session.
Dependency Injection: Making the Loop Testable
The dialog loop touches four external dependencies: the LLM API, the compression functions, context collapse, and UUID generation. All four are mockable in tests — but only if you design for it.
Claude Code’s approach: define a QueryDeps interface with these four dependencies. The loop accepts an optional deps parameter. If provided, it uses those; otherwise it falls back to production defaults.
interface QueryDeps {
  callModel: (params: ...) => AsyncGenerator<...>
  microcompact: (messages: ...) => Promise<...>
  autocompact: (messages: ...) => Promise<...>
  uuid: () => string
}
In tests: queryLoop({ ..., deps: { callModel: mockLLM, uuid: () => 'test-id' } }). No module-level spying, no global state, no test interference. Each test gets its own dependency instance.
The alternative — relying on module-level jest.spyOn — couples your tests to module internals. When you rename a file, tests break. When you add a new dependency, you have to update every test file that mocks it. Dependency injection cuts this coupling entirely.
This is a transferable pattern: define an injectable deps interface for your loop, keep the default implementations separate, and make tests pass custom deps.
Functional Design vs. Class: Why the Loop Uses a Function
You might expect the dialog loop to be a class — something like new DialogLoop(config).run(). Claude Code chose async function* instead. The reasoning is instructive:
-
Natural state isolation: Each function call creates a new closure. State can’t accidentally leak between concurrent loop instances. With a class, two concurrent dialogs might share properties on the same instance.
-
Composability via
yield*: Generator delegation (yield*) lets you forward events from sub-generators transparently. Tool execution is itself a generator. The main loop delegates to it, and the caller’sfor await...ofsees a unified flat event stream. -
Generator
.return()for cleanup: Callinggenerator.return()triggers thefinallyblock deterministically. This is how Ctrl+C becomes a reliable cleanup trigger — not a “hope the event handler fires” situation.
Anti-pattern warning: Avoid storing dialog state in global variables or class instance properties. Global state makes concurrent testing impossible. Class instance state allows multiple concurrent dialogs to interfere. Function closures are the safest state container — naturally isolated, naturally unshareable.
The State Object Pattern
Immutable state through a mutable loop. This sounds contradictory but it’s one of the more powerful patterns in the codebase.
The state object holds all cross-iteration data: message list, tool context, compression tracking, recovery counter, turn count, last-continue reason. At the top of each iteration, destructure from it (read snapshot). At the bottom, write a brand-new object (atomic update).
Why does the transition field (last-continue reason) matter? It prevents recovery loops. If context compression fails and the loop tries to recover, it records transition: 'autocompact_attempted'. On the next iteration, it checks this field and doesn’t attempt autocompact again — preventing an infinite recovery cycle.
This is the general principle: the state object should carry enough metadata to make each iteration’s decisions correct given only that snapshot — no reliance on side effects or external state.
Key Takeaways
- Use a
while(true)loop, not recursion. State recovery, abort control, and debuggability are all simpler in a loop. - AsyncGenerator is the right abstraction for the loop: streaming, cancellable, and backpressure-controlled simultaneously.
- Design the five-phase turn lifecycle explicitly: initialization, preprocessing, API call, tool execution, backfill.
- The preprocessing pipeline should cascade from lightweight (snip) to heavyweight (full autocompact). Design this before you hit context limits in production.
- Define ten termination conditions, not one. The granularity is what enables debugging and recovery logic.
- Use dependency injection for the loop’s external calls. It makes tests clean and coupling minimal.
- State should be immutable across iterations: read a snapshot at the start, write a new object at the end.
What’s Next
In Part 3: The Tool System — How Agents Act on the World, we go into the tool layer:
- Why a tool interface contract matters more than just function pointers
- The five-element tool protocol: name, schema, permissions, execution, rendering
- Static registry vs. dynamic discovery — and when deferred loading saves real cost
- How to partition tool calls into safe-to-parallelize and must-serialize batches
- The StreamingToolExecutor state machine: how tool results stay ordered even when execution is parallel
References
Agent loop patterns
- Building Effective Agents — Anthropic Research
- LLM Powered Autonomous Agents — Lilian Weng
- Claude Code Common Workflows — Official docs
Streaming and AsyncGenerator
- Master the Claude API for Streaming and Tool Use — n1n.ai
- Dive into Claude Code: Design Space of AI Agent Systems — arxiv
Architecture analysis


Comments